> ## Documentation Index
> Fetch the complete documentation index at: https://docs.caplena.com/llms.txt
> Use this file to discover all available pages before exploring further.
# ChatGPT
> Connect Caplena Insight Agent to ChatGPT using the Model Context Protocol (MCP).
Connect your Caplena workspace to ChatGPT using the Model Context Protocol (MCP) to query feedback data, summarize projects, and analyze customer comments directly from ChatGPT.
Custom MCP servers require a **ChatGPT Plus, Pro, Business, Enterprise, or Edu** subscription. **Developer Mode** must be enabled.
Availability of custom MCP servers may vary by account, workspace, and region.
## Before You Start
Before connecting Caplena, make sure that:
* You have a Caplena account.
* At least one Caplena project is set to **Live**.
* You have a supported ChatGPT subscription.
* Developer Mode is available on your ChatGPT account.
Only projects set to **Live** are available through the Insight Agent.
[Learn how to set a project to Live →](/get-started/project-settings/setting-a-project-to-live)
***
## Step 1: Enable the Insight Agent in Caplena
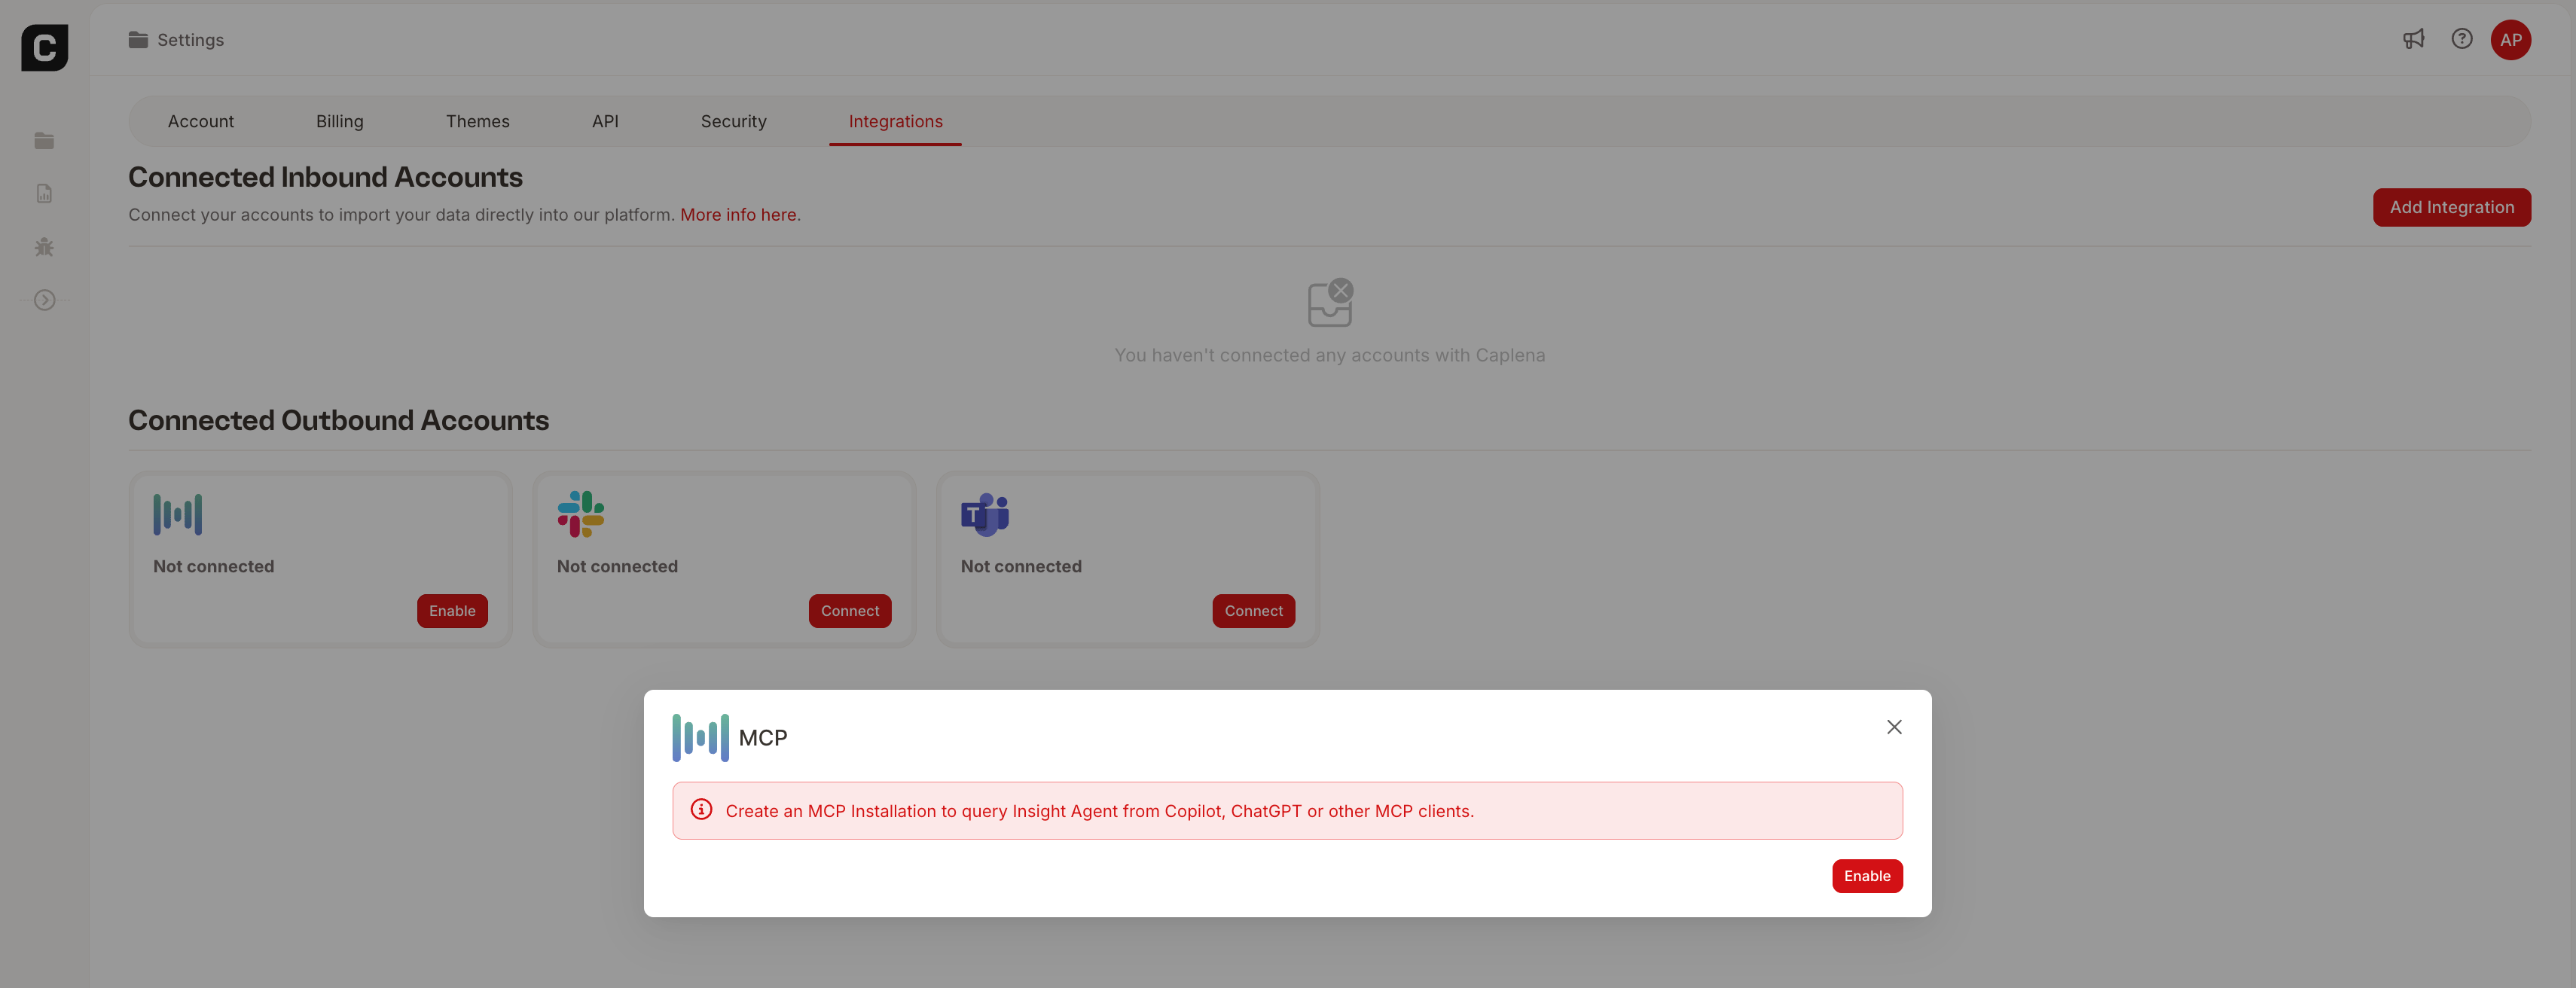 Go to **Settings → Integrations** inside Caplena.
Locate the **Insight Agent (MCP)** integration and click **Enable**.
Confirm the installation.
Once the installation has been created, copy the **MCP URL**.
It will look similar to: [https://api.caplena.com/v2/outbound-connectors/mcp](https://api.caplena.com/v2/outbound-connectors/mcp) You'll use this URL when creating the ChatGPT app.
***
## Step 2: Enable Developer Mode in ChatGPT
Go to **Settings → Integrations** inside Caplena.
Locate the **Insight Agent (MCP)** integration and click **Enable**.
Confirm the installation.
Once the installation has been created, copy the **MCP URL**.
It will look similar to: [https://api.caplena.com/v2/outbound-connectors/mcp](https://api.caplena.com/v2/outbound-connectors/mcp) You'll use this URL when creating the ChatGPT app.
***
## Step 2: Enable Developer Mode in ChatGPT
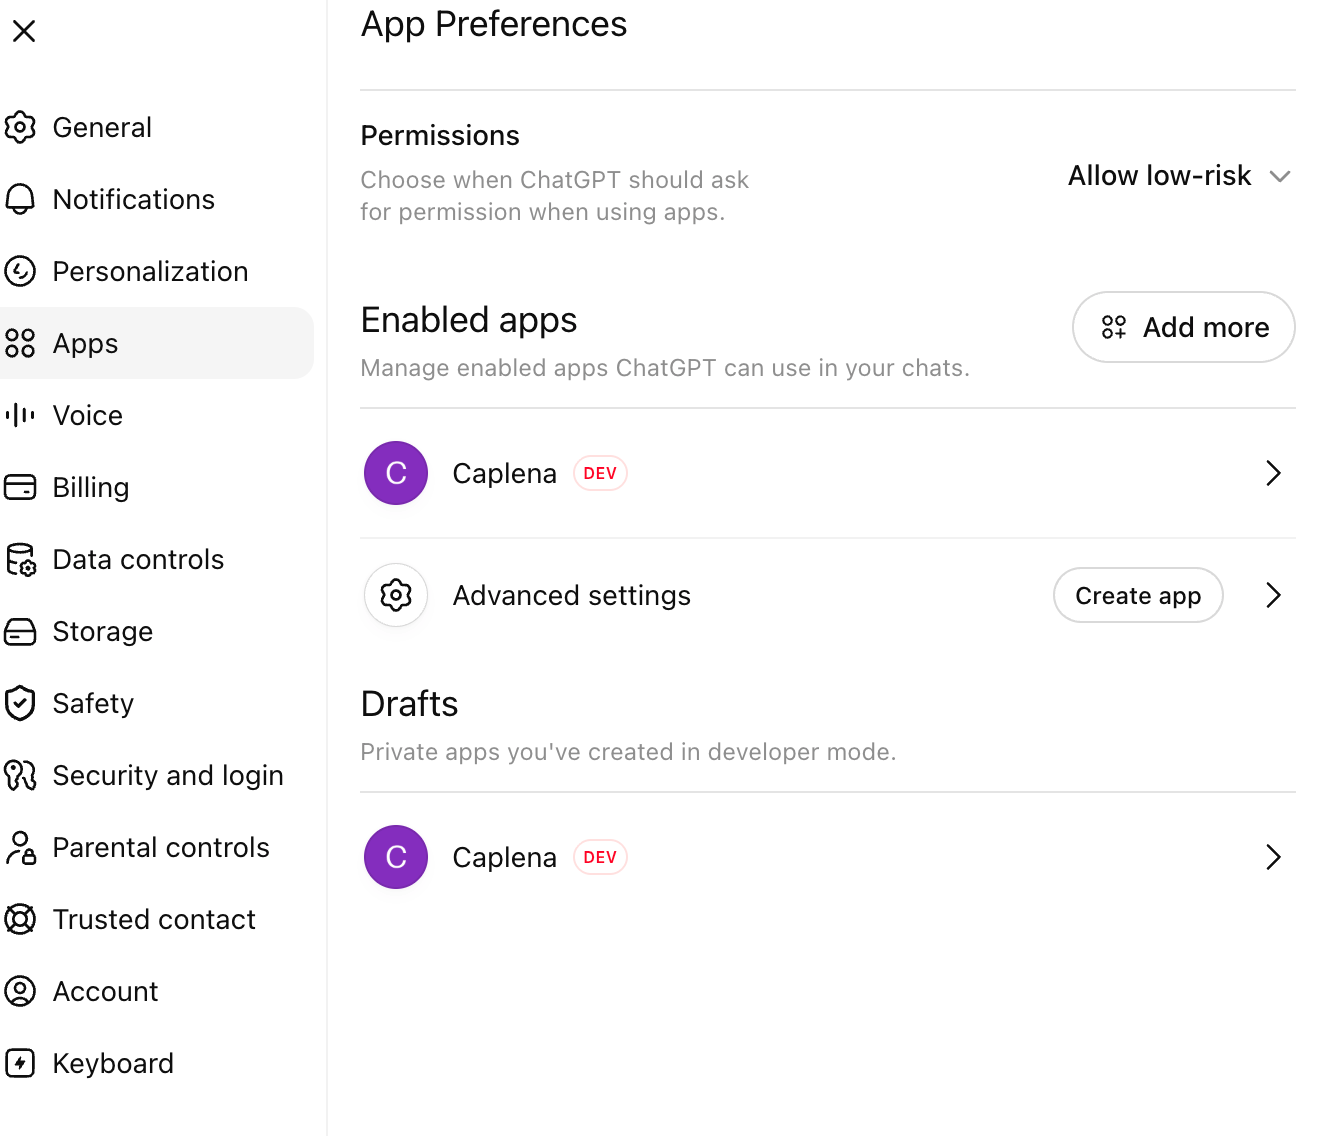 Open ChatGPT.
Click your profile picture in the bottom-left corner and choose **Settings**.
Navigate to:
**Apps → Advanced settings**
Turn on **Developer Mode**.
This allows ChatGPT to connect to custom MCP servers.
***
## Step 3: Create the Caplena App\\
\\
Open ChatGPT.
Click your profile picture in the bottom-left corner and choose **Settings**.
Navigate to:
**Apps → Advanced settings**
Turn on **Developer Mode**.
This allows ChatGPT to connect to custom MCP servers.
***
## Step 3: Create the Caplena App\\
\\
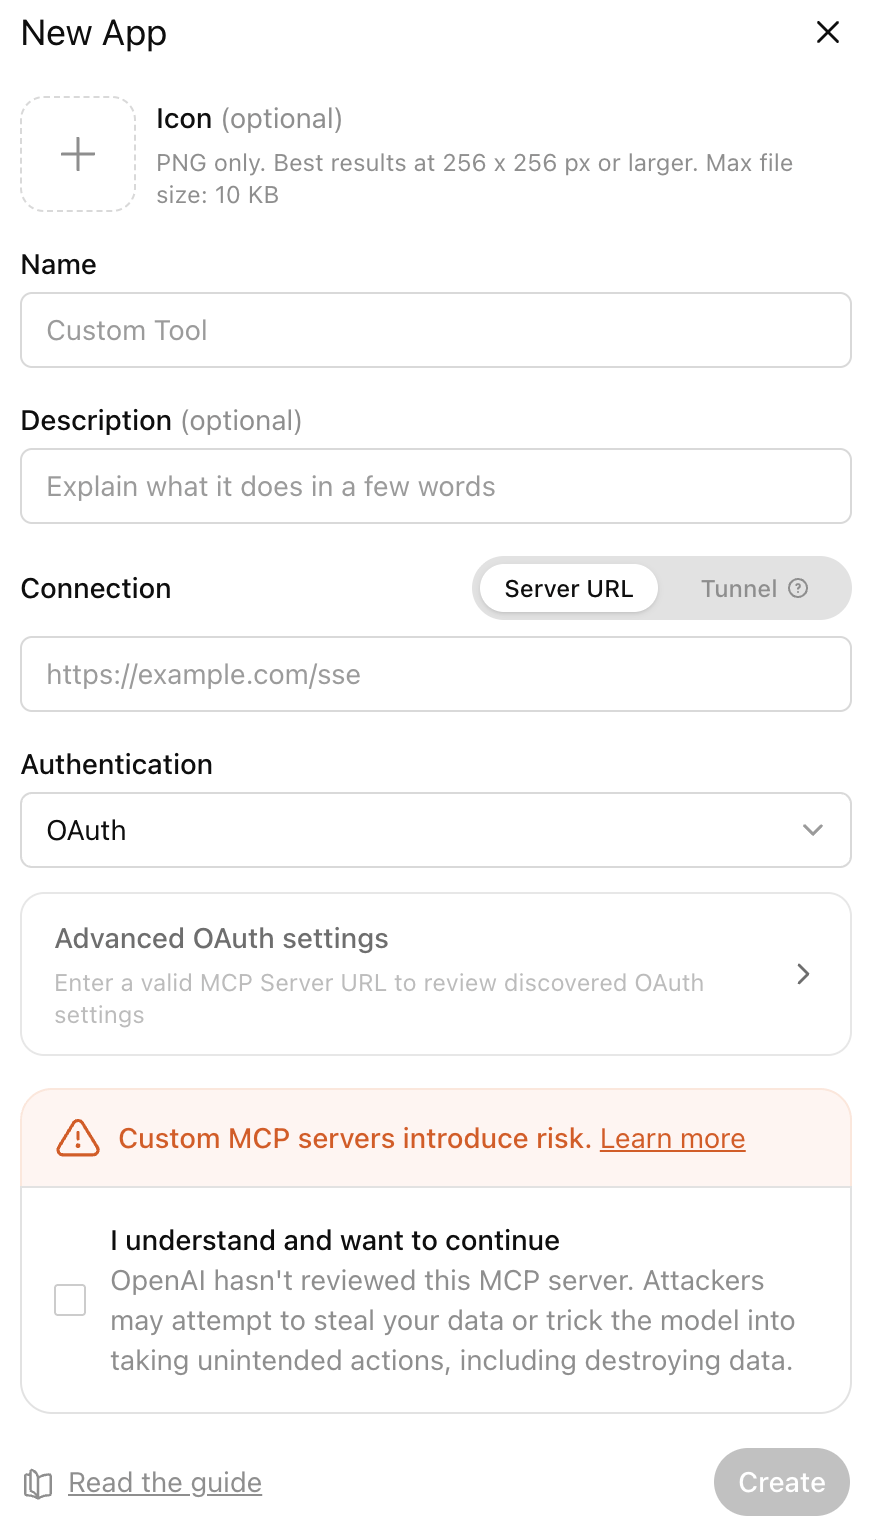 Go to:
**Settings → Apps**
Click **Create**.
Fill in the following:
* **Name:** Caplena
* **MCP Server URL:** paste the URL copied from Caplena
You do **not** need to manually enter OAuth endpoints.
ChatGPT automatically discovers:
* OAuth issuer
* Authorization endpoint
* Token endpoint
* Dynamic Client Registration
* Supported scopes
from the MCP server.
ChatGPT will verify the MCP server and display the available tools.
Click **Create**.
You'll be redirected to Caplena.
Sign in if necessary.
Review the requested permissions.
Click **Authorize**.
You'll then be redirected back to ChatGPT.
## Step 4: Start Using Caplena
Start a **new ChatGPT conversation**.
Enable the **Caplena** app from the available Apps/Tools menu.
You can now ask questions such as:
> List the projects I have access to.
> Summarize the latest customer feedback.
> What are the top themes in our NPS survey?
> Compare the latest wave with the previous quarter.
> Show me comments mentioning delivery delays.
The first time ChatGPT accesses Caplena, it may ask for your permission.
You can choose **Always allow** if you don't want to approve every request individually.
***
## Advanced: Deep Research with Caplena Data
ChatGPT's **Deep Research** feature can combine your Caplena feedback data with web sources in a single research task — useful for contextualizing customer feedback against external information.
Example prompts:
> Using my Caplena NPS project and recent industry reports, write a competitive analysis of how our product perception compares to the market.
> Cross-reference the top complaints from my Caplena support feedback with publicly reported issues for \[competitor] and summarize the gaps.
> Based on my Caplena Q1 feedback and current market trends, draft a product prioritization recommendation.
To use it: open a chat, click **Deep Research** under the input field, add Caplena as a source, and enter your prompt.
Deep Research is available on ChatGPT **Pro** and higher plans.
***
## Troubleshooting
### I don't see "Developer Mode"
Developer Mode is only available for supported ChatGPT plans and may not yet be enabled for every account or workspace.
### Authentication fails
Make sure:
* your MCP installation is enabled in Caplena
* you're signing in with the correct Caplena account
* your project is set to **Live**
### No projects are returned
Only **Live** projects are accessible through the Insight Agent.
Check that:
* the project is Live
* your Caplena user has permission to access it
### Do I need to copy the OAuth configuration?
No.
ChatGPT automatically discovers the OAuth configuration from the MCP server.
The additional OAuth details displayed in Caplena are primarily intended for MCP clients that require manual configuration.
Go to:
**Settings → Apps**
Click **Create**.
Fill in the following:
* **Name:** Caplena
* **MCP Server URL:** paste the URL copied from Caplena
You do **not** need to manually enter OAuth endpoints.
ChatGPT automatically discovers:
* OAuth issuer
* Authorization endpoint
* Token endpoint
* Dynamic Client Registration
* Supported scopes
from the MCP server.
ChatGPT will verify the MCP server and display the available tools.
Click **Create**.
You'll be redirected to Caplena.
Sign in if necessary.
Review the requested permissions.
Click **Authorize**.
You'll then be redirected back to ChatGPT.
## Step 4: Start Using Caplena
Start a **new ChatGPT conversation**.
Enable the **Caplena** app from the available Apps/Tools menu.
You can now ask questions such as:
> List the projects I have access to.
> Summarize the latest customer feedback.
> What are the top themes in our NPS survey?
> Compare the latest wave with the previous quarter.
> Show me comments mentioning delivery delays.
The first time ChatGPT accesses Caplena, it may ask for your permission.
You can choose **Always allow** if you don't want to approve every request individually.
***
## Advanced: Deep Research with Caplena Data
ChatGPT's **Deep Research** feature can combine your Caplena feedback data with web sources in a single research task — useful for contextualizing customer feedback against external information.
Example prompts:
> Using my Caplena NPS project and recent industry reports, write a competitive analysis of how our product perception compares to the market.
> Cross-reference the top complaints from my Caplena support feedback with publicly reported issues for \[competitor] and summarize the gaps.
> Based on my Caplena Q1 feedback and current market trends, draft a product prioritization recommendation.
To use it: open a chat, click **Deep Research** under the input field, add Caplena as a source, and enter your prompt.
Deep Research is available on ChatGPT **Pro** and higher plans.
***
## Troubleshooting
### I don't see "Developer Mode"
Developer Mode is only available for supported ChatGPT plans and may not yet be enabled for every account or workspace.
### Authentication fails
Make sure:
* your MCP installation is enabled in Caplena
* you're signing in with the correct Caplena account
* your project is set to **Live**
### No projects are returned
Only **Live** projects are accessible through the Insight Agent.
Check that:
* the project is Live
* your Caplena user has permission to access it
### Do I need to copy the OAuth configuration?
No.
ChatGPT automatically discovers the OAuth configuration from the MCP server.
The additional OAuth details displayed in Caplena are primarily intended for MCP clients that require manual configuration.